2026. 3. 17. 21:02ㆍ개발/FE
Intro
마이그레이션 작업 중 빌드 속도가 눈에 띄게 빨라진 적이 있었습니다. 어떤 변경이 원인인지 설명하려다 막혔습니다. tsconfig 옵션 몇 개를 건드렸다는 건 알았지만, 왜 그게 효과가 있는지는 몰랐습니다.
그 경험이 이 글을 쓰게 된 계기입니다. TypeScript 컴파일러가 실제로 어떤 순서로, 어떤 이유로 동작하는지 이해하면 빌드가 느릴 때 어디서부터 손봐야 할지, 팀원에게 설정 변경 이유를 어떻게 설명할지 훨씬 명확해집니다.
TypeScript 컴파일 과정의 전체 흐름
tsc는 소스 파일을 받아 다섯 단계를 거쳐 JavaScript를 출력합니다.
소스 파일 → Program 생성 → 파싱(AST) → 바인딩(Symbol) → 타입 체킹 → Emit
각 단계는 독립적이지 않습니다. 바인딩이 끝난 심볼 테이블을 타입 체커가 참조하고, 파싱 결과인 AST를 이미터가 그대로 읽어 코드를 출력합니다.
1. 프로그램 생성 단계 (Program Creation)
컴파일러는 tsconfig.json을 읽는 것부터 시작합니다. 어떤 파일을 컴파일 대상으로 볼지, 어떤 옵션을 적용할지가 여기서 결정됩니다.
이후 루트 파일에서 출발해 import 구문을 따라가며 의존성 그래프를 구성합니다. 재귀적으로 파일을 탐색하기 때문에 A.ts가 B.ts를 import하고, B.ts가 C.ts를 import하면 셋 다 컴파일 대상이 됩니다.
function createProgram(rootFiles, options):
    host = createCompilerHost(options)
    sourceFiles = Map<string, SourceFile>()
    moduleCache = createModuleResolutionCache()

    for each file in rootFiles:
        processFile(file)

    return program

function processFile(fileName):
    sourceFile = host.readFile(fileName)
    sourceFiles.set(fileName, sourceFile)

    for each import in sourceFile.imports:
        resolvedPath = resolveModule(import, fileName)
        if resolvedPath not in sourceFiles:
            processFile(resolvedPath)
실제 TypeScript 코드:
// typescript/src/compiler/program.ts (핵심만 발췌)
export function createProgram(rootNames, options, host) {
  const files = new Map<string, SourceFile>();
  const moduleResolutionCache = createModuleResolutionCache(...);

  for (const fileName of rootNames) {
    processRootFile(fileName);
  }

  return program;
}
의존성 그래프 예시

이 단계에서 TypeScript는 프로젝트의 모든 파일을 한 번에 메모리에 올립니다. 타입 체킹의 정확성을 위한 구조이지만, 프로젝트 규모가 커질수록 초기 로딩 시간과 메모리 사용량이 증가하는 이유이기도 합니다.
tsconfig 설정으로 이 단계를 조정할 수 있습니다:
{
  "compilerOptions": {
    "skipLibCheck": true,        // node_modules의 .d.ts 파일 체크 생략
    "incremental": true,         // 이전 빌드 정보를 캐시로 저장
    "tsBuildInfoFile": "./.tsbuildinfo"
  }
}
Project References는 큰 프로젝트를 독립적으로 컴파일 가능한 단위로 분리해, 변경이 없는 패키지는 캐시된 결과를 그대로 씁니다.
2. 파싱 단계 (Parsing)
파서는 두 단계로 동작합니다. 먼저 스캐너(Scanner)가 소스 텍스트를 토큰 스트림으로 쪼개고, 파서(Parser)가 그 토큰들을 조합해 추상 구문 트리(AST)를 만듭니다.
스캐너: 텍스트를 토큰으로
function scan(sourceText):
    position = 0

    while position < sourceText.length:
        char = sourceText[position]

        if char == '(':    return Token(OpenParen)
        if char == ')':    return Token(CloseParen)
        if char == ':':    return Token(Colon)
        if char is letter: return Token(Identifier, scanIdentifier())
        if char == '"':    return Token(StringLiteral, scanString())

        position++
const greeting: string = "Hello";를 스캐너에 넣으면:
const     → ConstKeyword
greeting  → Identifier
:         → ColonToken
string    → Identifier (타입)
=         → EqualsToken
"Hello"   → StringLiteral
;         → SemicolonToken
파서: 토큰에서 AST로
// typescript/src/compiler/parser.ts (단순화)
function parseVariableDeclaration(): VariableDeclaration {
  const name = parseIdentifier();
  const type = parseOptional(SyntaxKind.ColonToken)
    ? parseTypeAnnotation()
    : undefined;
  const initializer = parseOptional(SyntaxKind.EqualsToken)
    ? parseInitializer()
    : undefined;

  return factory.createVariableDeclaration(name, undefined, type, initializer);
}
결과로 만들어지는 AST 구조:
VariableStatement
├─ VariableDeclarationList (flags: Const)
│  └─ VariableDeclaration
│     ├─ Identifier: "greeting"
│     ├─ TypeAnnotation
│     │  └─ TypeReference
│     │     └─ Identifier: "string"
│     └─ StringLiteral: "Hello"
파싱은 순수하게 문법 구조만 분석하므로 선형 시간 O(n)으로 동작합니다. 1,000줄 파일 기준 50ms 수준이라 전체 빌드 시간에서 차지하는 비중이 크지 않습니다.
3. 바인딩 단계 (Binding)
바인더는 AST를 순회하면서 각 식별자에 심볼(Symbol)을 부여하고 스코프 구조를 잡습니다. 이 심볼 테이블이 나중에 타입 체커의 기반이 됩니다.
바인더의 핵심 로직
function bindSourceFile(file):
    file.symbolTable = {}
    currentScope = file
    bindNode(file)

function bindNode(node):
    node.parent = currentParent

    if node is VariableDeclaration:
        bindVariableDeclaration(node)
    else if node is FunctionDeclaration:
        bindFunctionDeclaration(node)

    for each child in node.children:
        bindNode(child)

function bindVariableDeclaration(node):
    symbol = {
        name: node.name,
        flags: determineFlags(node),
        declarations: [node]
    }
    currentScope.symbolTable[node.name] = symbol
// typescript/src/compiler/binder.ts (핵심만)
function bindVariableDeclaration(node: VariableDeclaration) {
  const flags =
    getCombinedNodeFlags(node) & NodeFlags.BlockScoped
      ? SymbolFlags.BlockScopedVariable
      : SymbolFlags.FunctionScopedVariable;

  declareSymbol(
    container.locals!,
    undefined,
    node,
    flags,
    SymbolFlags.VariableExcludes
  );
}
스코프와 심볼 테이블 예시
const msg = "hello";

function welcome(str: string) {
  const user = str;
  return msg + " " + user;
}

바인딩 단계가 끝나면 AST의 각 노드는 자신이 어떤 심볼에 속하는지, 그 심볼의 스코프가 어디인지를 알고 있습니다. 타입 체커는 이 정보를 바탕으로 변수가 어디서 선언됐고 어떤 타입을 갖는지 추적합니다.
4. 타입 체킹 단계 (Type Checking)
전체 빌드 시간의 60~70%를 차지하는 단계입니다. 타입 추론과 호환성 검사가 여기서 이루어집니다.
타입 추론 로직
타입 체커는 각 표현식을 보고 타입을 결정합니다. 이미 계산한 결과는 캐시에 저장해 같은 표현식을 반복 계산하지 않습니다.
function getTypeOfExpression(node):
    if node in typeCache:
        return typeCache[node]

    if node is StringLiteral:   type = StringType
    if node is NumberLiteral:   type = NumberType
    if node is Identifier:
        symbol = lookupSymbol(node.name)
        type = getTypeOfSymbol(symbol)
    if node is CallExpression:
        functionType = getTypeOfExpression(node.function)
        type = getReturnType(functionType)
    if node is BinaryExpression:
        leftType  = getTypeOfExpression(node.left)
        rightType = getTypeOfExpression(node.right)
        type = inferBinaryOperationType(leftType, rightType)

    typeCache[node] = type
    return type
타입 호환성 검사
TypeScript는 구조적 타이핑(structural typing)을 씁니다. 타입 이름이 같아야 하는 게 아니라, 구조가 맞으면 호환됩니다.
function checkTypeCompatibility(source, target):
    if source == target:
        return true

    if source is ObjectType and target is ObjectType:
        return checkStructuralCompatibility(source, target)

    return false

function checkStructuralCompatibility(source, target):
    for each property in target.properties:
        sourceProperty = source.getProperty(property.name)

        if sourceProperty is null:
            return false  // 속성 없음

        if not checkTypeCompatibility(sourceProperty.type, property.type):
            return false

    return true
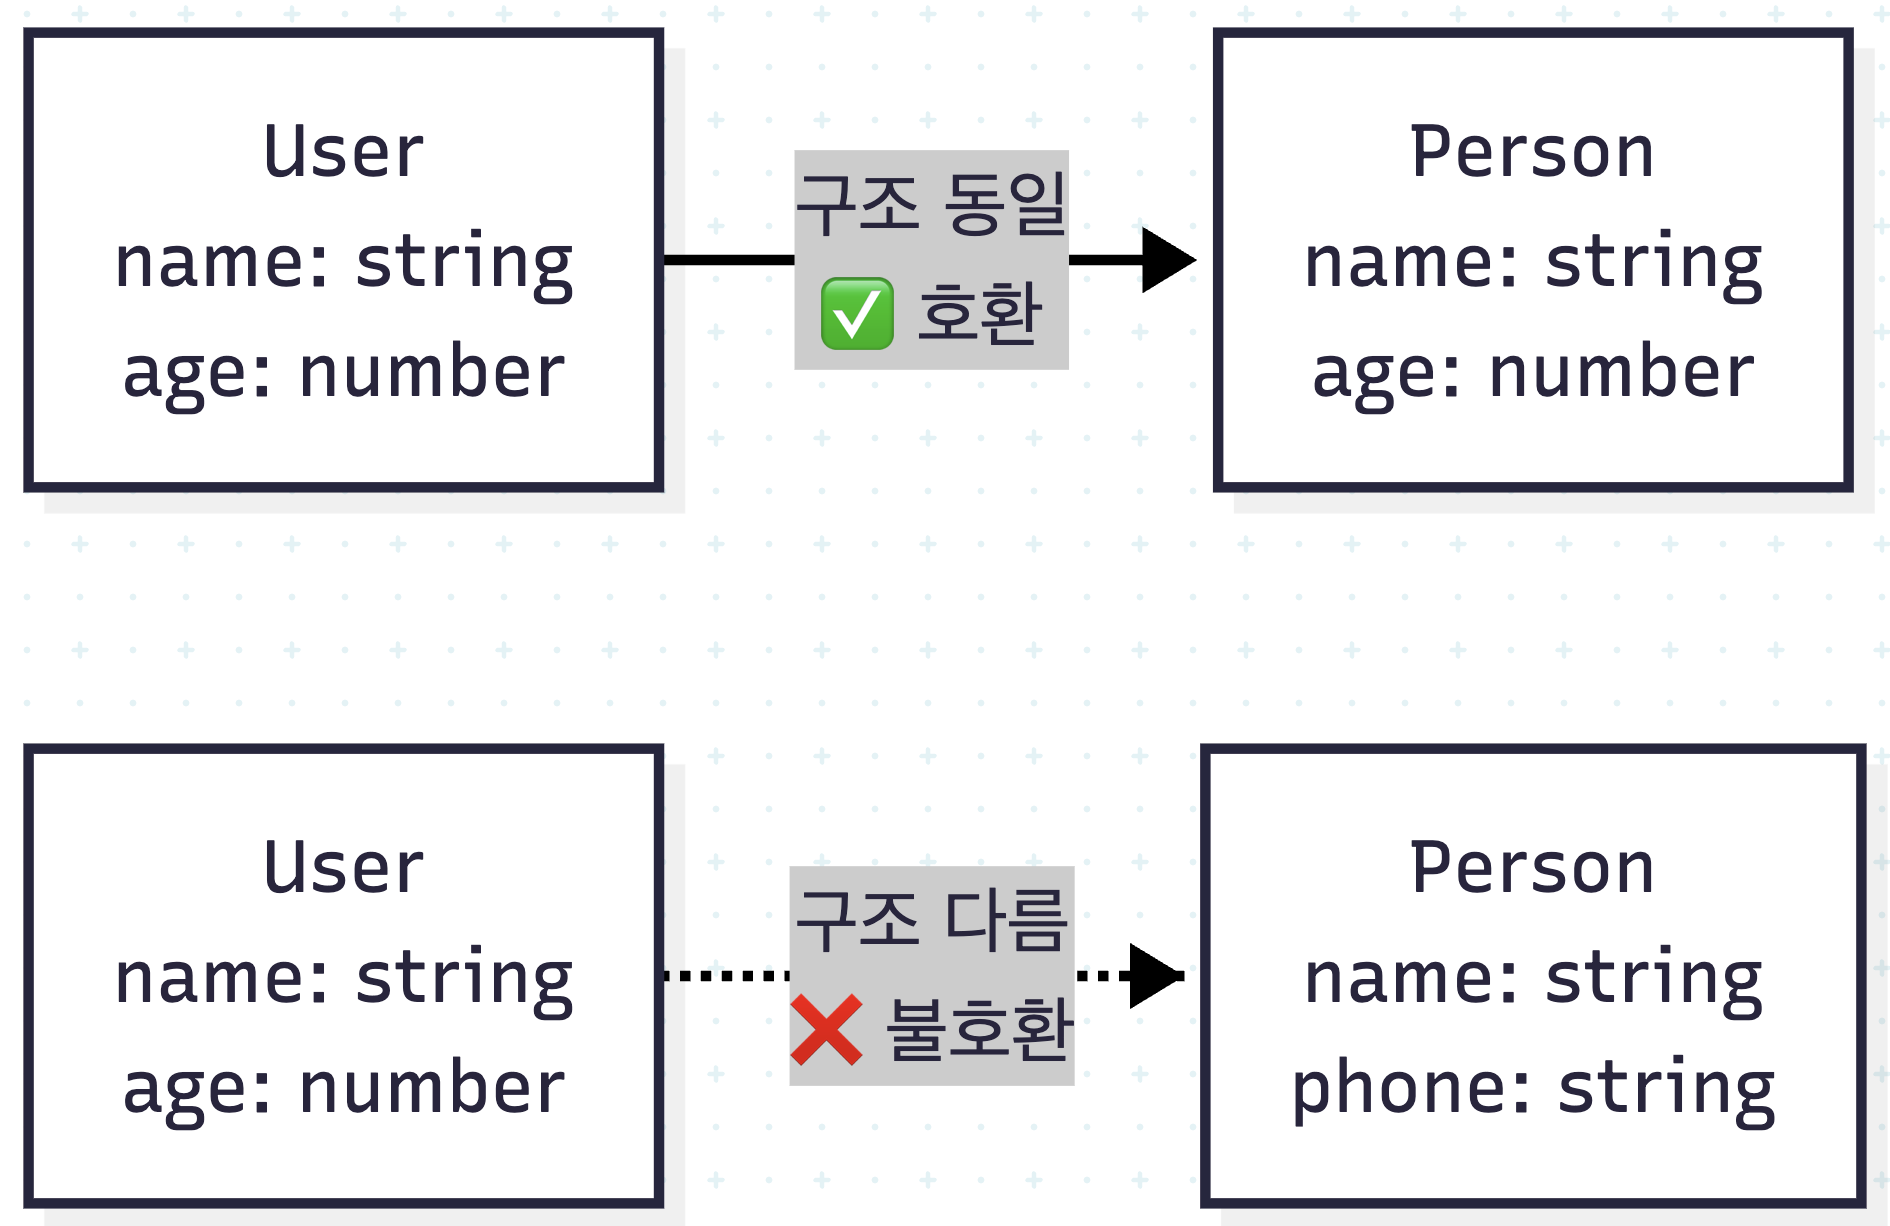
유니온 타입과 복잡도
유니온 타입이 복잡해질수록 비교 연산 횟수가 급격히 늘어납니다.
// 두 유니온 타입 간 호환성 검사
type A | B | C | D  vs  E | F | G | H
// 최악의 경우 4 × 4 = 16번 비교
// 일반적으로 O(n × m) 복잡도
타입 오류가 발생하는 위치와 방식을 이해하면 디버깅에 도움이 됩니다:

타입 체킹 속도를 높이려면 타입 추론에 드는 계산을 줄이는 게 핵심입니다. 타입을 명시하면 컴파일러가 추론을 건너뛰고 바로 검사로 넘어갑니다.
// 추론이 필요한 경우
const data = [1, "two", true, null];

// 명시적 타입: 추론 비용 없음
const data: Array<number | string | boolean | null> = [1, "two", true, null];
과도하게 복잡한 유니온 타입이나 제약 없는 제네릭도 타입 체킹 시간을 늘립니다. as const로 리터럴 타입을 고정하면 유니온 멤버 수를 줄이는 데 도움이 됩니다.
5. 변환 및 출력 단계 (Emit)
이미터(Emitter)가 AST를 읽어 JavaScript, .d.ts, .map 파일을 씁니다.
코드 변환 로직
타입 주석은 이 단계에서 제거됩니다. 그 외의 로직은 그대로 출력됩니다.
function emitVariableStatement(node):
    output = node.keyword + " "
    output += node.name
    // 타입 주석: 출력하지 않음
    if node.initializer:
        output += " = " + emitExpression(node.initializer)
    output += ";\n"
    return output

function emitDeclarationFile(node):
    output = "declare const " + node.name
    output += ": " + emitType(node.type)
    output += ";\n"
    return output

타입 체킹과 Emit은 독립적으로 동작합니다
타입 오류가 있어도 JavaScript 출력은 기본적으로 계속됩니다. noEmitOnError: true를 설정하면 오류가 있을 때 출력을 막을 수 있습니다. 개발 중에는 타입 오류가 있는 상태로 실행해보고 싶을 때가 있어서, 이 기본값이 실용적입니다.

Emit 단계 자체는 빠른 편이라 여기서 얻을 수 있는 최적화는 제한적입니다. .d.ts나 소스맵이 필요하지 않은 상황이라면 생성을 끄는 것만으로도 시간을 줄일 수 있습니다.
{
  "compilerOptions": {
    "declaration": false,
    "sourceMap": false,
    "removeComments": true
  }
}
성능 프로파일링
tsc --extendedDiagnostics로 각 단계가 실제로 얼마나 걸리는지 확인할 수 있습니다.
// 중규모 프로젝트 예시

Files:            450
Lines:            125000
Identifiers:      42000
Symbols:          28000
Types:            15000

I/O Read:         0.5s   (5%)
Parse:            1.2s   (12%)
Bind:             0.8s   (8%)
Check:            6.5s   (65%)
Transform:        0.5s   (5%)
Emit:             0.5s   (5%)
Total:            10.0s
타입 체킹이 65%를 차지합니다. 빌드가 느리다면 대부분 이 단계가 원인입니다. 빌드 전략을 바꾸기 전에 먼저 --extendedDiagnostics로 어디서 시간이 나가는지 확인하는 게 낫습니다.
실전 디버깅
타입 체킹 시간 분석:
tsc --diagnostics --extendedDiagnostics
빌드 캐시 활용 (incremental 빌드):
{
  "compilerOptions": {
    "incremental": true,
    "composite": true
  }
}
타입 오류 원인 추적:
두 타입이 왜 호환되지 않는지 직접 검증해볼 수 있습니다.
type Expected = Parameters<typeof myFunction>[0];
type Actual = typeof myArgument;

// 호환성 확인: 오류가 발생하면 Actual이 Expected를 만족하지 않음
const _check: Expected = {} as Actual;
마치며
컴파일러 동작 방식을 이해하기 전에는 skipLibCheck나 incremental 같은 옵션들이 그냥 "빌드를 빠르게 해주는 것들"로만 느껴졌습니다. 각 단계가 뭘 하는지 알고 나서야 어느 옵션이 어느 병목에 대응하는지, 왜 효과가 있는지 설명할 수 있게 됐습니다.
빌드가 느려질 때, 타입 오류가 이해하기 어려울 때, 프로젝트 구조를 어떻게 나눌지 고민될 때—이 다섯 단계를 떠올리면 실마리가 보이는 경우가 많습니다.
'개발 > FE' 카테고리의 다른 글
| 강남언니 SEO 웹 전략을 보고 정리한 테크니컬 SEO (0) | 2026.07.17 |
|---|---|
| TypeScript 컴파일러 성능 측정 (3.9 vs 5.8) (0) | 2026.03.29 |